Projects
The Conservation of Eight Large Scale Capricci Paintings by Pietro Paltonieri (c. 1740s) from the Dining Room at Shugborough Hall, National Trust
This project involved the conservation of eight large scale capricci paintings from the Dining Room at Shugborough Hall, National Trust. Unusually, the capricci were painted in distemper (pigment bound with animal glue) on canvas. With a complex attribution history: seven of the capricci are by Pietro Paltronieri (1673–1741); two were later extended by Biagio Rebecca (1731–1808); and the eighth has recently been re-attributed to Antonio Joli (1700-1777).
The capricci paintings were prioritised for conservation work owing to the instability of the distemper paint layers, which were lifting and flaking away from the canvas support. Conservation of the eight large scale paintings took place between October 2018 and December 2019 and was funded by the National Trust.
Treatments carried out included: carrying out an in depth mapping survey of flaking paint prior to conservation; taking cross-section samples for analysis; consolidation; surface cleaning; cleaning of the reverse; attachment of protective backings; filling and retouching; full photography and documentation.
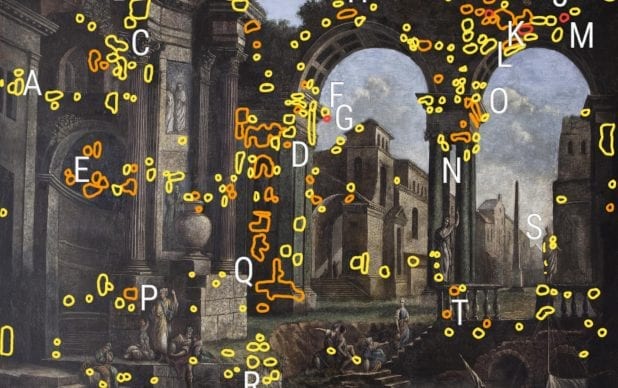
In October 2018 a mapping survey was undertaken, whereby each painting was carefully assessed in a raking light, and areas of flaking were documented. A rating system of ‘severe’, ‘moderate’ and ‘mild’ flaking were followed, and the affected areas indicated with either red, amber or yellow outlines. This mapping exercise would help with the longer term monitoring of these vulnerable and sensitive distemper paintings. Below you can see ‘Capriccio: Roman Ruins at Bologna’ with the areas of flaking and instability mapped out.

The eight capricci were conserved systematically, over a one year period, beginning in January 2019. The conservation work took place in the Dining Room and in front of the public, as part of the National Trust ‘Conservation in Action’ scheme. Owing to space constraints, one capricco was taken down and conserved and replaced into position before the next capricco was taken down for treatment.
The first stage of treatment was to stabilise the flaking paint layers. A selection of adhesives were tested for their suitability in consolidating the distemper paint layers and re-adhering them back down onto their canvas supports. Test results showed that the best adhesive for these particular paintings was a mixture of Isinglass (a fish glue derived from the swim bladder of the Sturgeon fish) and Jun Funori (a Japanese glue extracted from the red algae genus Gloiopeltis). The mixture of these two adhesives gave the matt properties required to tie in with the matt paint layers, as well as providing the adhesive strength required to re-adhere the flaking layers back down onto the canvas support.
Consolidation of the paint layers was a painstaking and intricate task. The warmed adhesive mixture was applied to the paint layers using a fine sable brush, and allowed to flow between the paint layers and canvas. Excess adhesive was cleared and the paint layers were laid back down onto the canvas using gentle heat and pressure supplied by a thermostatically controlled spatula.
Where possible, the paint layers were consolidated whilst the paintings were supported horizontally, on work tables. This allowed the adhesive to flow down between the paint layer and canvas and reduced the risk of any flakes of paint falling away and becoming lost. It was possible to reach approximately 90cm in towards the centre of each painting.
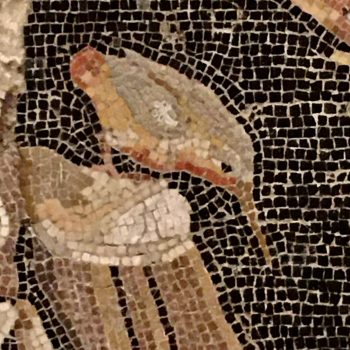
The photograph below shows the same area in the photograph above, but was taken after the lifting and flaking paint layers had been sucessfully consolidated.

Once the paint layers had been consolidated and stabilised, it was possible to begin surface cleaning.
Tests were carried out to determine the safest method and cleaning mixture to remove 28 years worth of dust and dirt, which had accumulated on the surfaces of each capricci.
Cleaning was then carried out using cotton wool swabs and the chosen cleaning solvent. Here you can see the conservator works systematically along the sides of the painting.

Once the 90cm width perimeters of the larger paintings had been sucessfully consolidated and surface cleaned, the paintings were supported upright on a large A-frame. The central area of each painting could then be reached and treated either standing, using steps or using a small scaffolding tower.
The next stage of treatment was to remove dust and debris at the reverse of each canvas and stretcher using a Museum Vac and Dry Cleaning Sponge. Monofilament line and brass screws and cups were used to secure any loose keys to the stretcher. A breathable but waterproof fabric backing was then attached to the reverse of each capricci, to protect them for the future.

The final stages of treatment involved in-painting any damages or losses, and applying fine glazes to reduce the appearance of old discoloured over-paint layers. Retouching was carried out using dry pigments bound with a stable synthetic binder.